If a web app can’t access your Android camera, it’s likely due to permission settings, browser restrictions, or outdated software. Adjust settings to fix it.
Web apps have become an essential part of our daily lives, helping us do everything from chatting with friends to managing work tasks. However, sometimes, you might face a problem where a web app can’t access your Android phone’s camera. This can be frustrating, especially when you need the camera for things like video calls, scanning QR codes, or uploading photos. In this article, we’ll explore the reasons why this might happen and provide simple steps to fix the issue.
Your Android phone has built-in security features to protect your privacy, including controlling which apps can access your camera. When a web app wants to use your camera, it has to ask for permission first. If the app doesn’t get the right permission, it won’t be able to use the camera. There are a few common reasons why this might happen:
- Permission Not Granted: If you didn’t allow the app to use the camera when it first asked, it won’t be able to access it later.
- Browser Settings Blocking Access: Some web browsers block camera access by default, so the app can’t use the camera until you change the settings.
- Outdated Software: If your web browser or Android operating system is out of date, it might cause problems with the app accessing the camera.
- Other Apps Causing Conflicts: If another app is using the camera at the same time, it might prevent the web app from accessing it.
One of the most common reasons is that the web app doesn’t have the necessary permissions to access your camera. If you accidentally denied permission, the app will be blocked from using the camera until you change the settings.
Web browsers have different default settings, and some may block camera access to protect your privacy. This means you’ll need to manually allow the web app to use your camera.
If your browser or Android operating system is outdated, it might not work well with the web app, causing issues with camera access.
Sometimes, other apps running in the background may also be trying to use the camera, which can create conflicts and prevent the web app from accessing it.
The first thing to do is check whether the app has permission to access your camera:
- Step 1: Open your phone’s Settings.
- Step 2: Go to Apps & notifications.
- Step 3: Find and tap on the browser you’re using.
- Step 4: Select Permissions.
- Step 5: Make sure the Camera option is turned on.
Also read: V4l2 Determine Camera Type – Step-by-Step Guide!
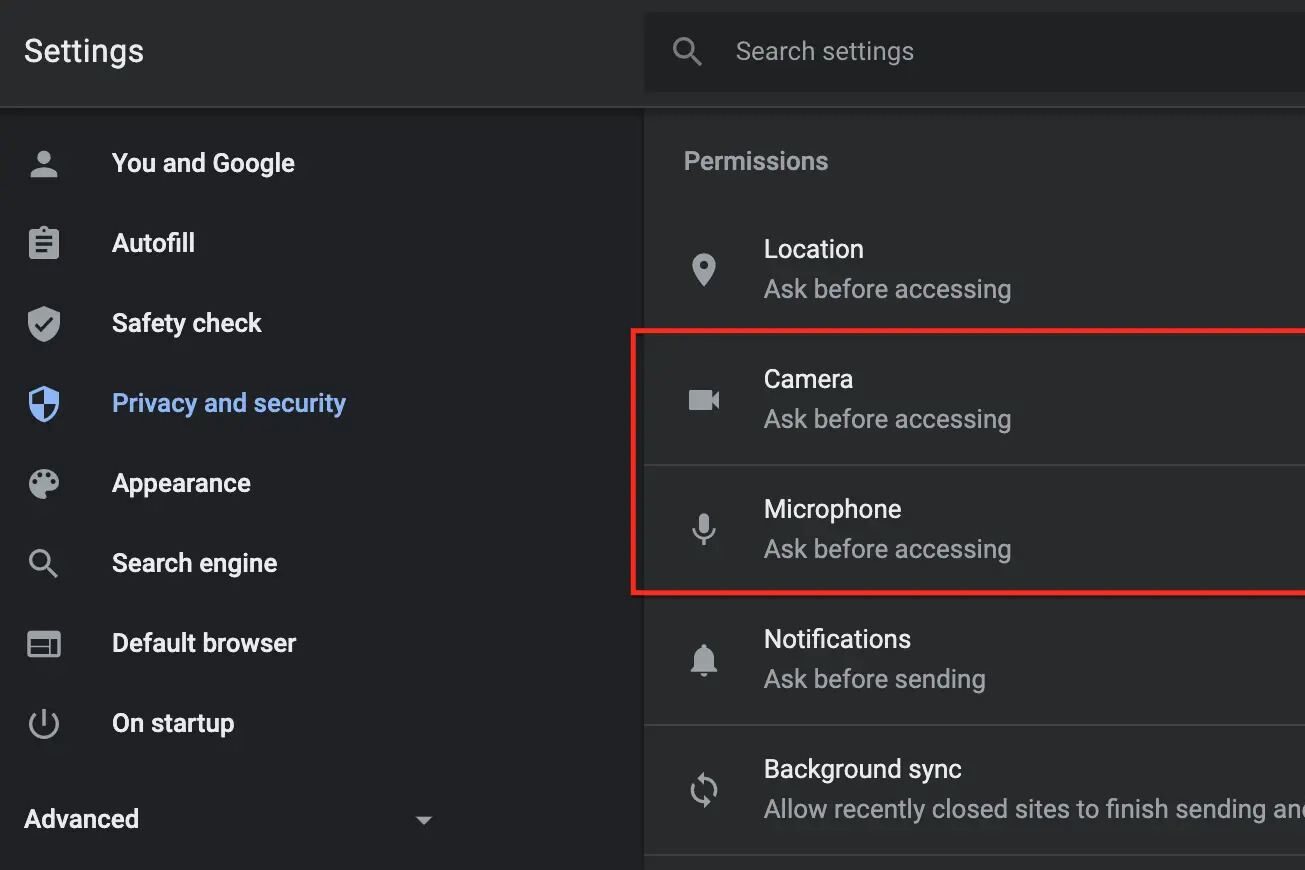
You might need to change the settings in your web browser to allow camera access:
- For Chrome Users: Open Chrome, tap on the three dots in the top-right corner, go to Settings > Site settings > Camera, and ensure the web app is allowed to use the camera.
- For Firefox Users: Open Firefox, tap on the three lines in the bottom-right corner, go to Settings > Permissions, and enable camera access for the web app.
Keeping your software up to date can solve many problems, including camera access issues:
- Step 1: Go to the Google Play Store.
- Step 2: Search for your browser and check if an update is available.
- Step 3: Update your Android OS by going to Settings > System > System update.
If another app is using the camera, it might block your web app from accessing it. To fix this:
- Step 1: Close all background apps by tapping the square button on your phone and swiping the apps away.
- Step 2: Restart the web app and try using the camera again.
Sometimes, clearing your browser’s cache and data can fix problems with accessing the camera:
- Step 1: Open Settings on your phone.
- Step 2: Tap on Apps & notifications.
- Step 3: Find and select your browser.
- Step 4: Tap on Storage & cache, then select Clear cache and Clear data.
If none of the above steps work, try resetting app preferences:
- Step 1: Go to Settings > Apps & notifications.
- Step 2: Tap on the three dots in the top-right corner.
- Step 3: Select Reset app preferences. This will reset all your app settings, including camera permissions, but won’t delete any app data.
As of 2024, resolving camera access issues in web apps on Android devices requires updated troubleshooting techniques. Common problems often stem from permission errors, browser settings, or outdated software. To address these issues, ensure your browser has the correct permissions, update both your browser and Android OS, and clear any conflicting apps or cache. By following these current solutions, you can effectively restore camera functionality in web apps.

If your current browser still can’t access the camera, try using a different browser like Chrome, Firefox, or Edge to see if the issue persists.
Safe Mode disables all third-party apps, which can help you determine if another app is causing the problem:
- Step 1: Press and hold the power button.
- Step 2: Long press Power off until the Safe mode option appears.
- Step 3: Tap on Safe mode and try using the camera in the web app.
If all else fails, you can perform a factory reset on your phone. This will erase all your data, so be sure to back up important files first:
- Step 1: Go to Settings > System > Reset options.
- Step 2: Select Erase all data (factory reset) and follow the instructions.
This is often due to incorrect permission settings, browser restrictions, or outdated software.
Go to your phone’s Settings, find the browser app under Apps & notifications, and enable camera permissions.
Try updating your browser and Android OS, clear cache and data, or switch to a different browser.
Yes, if another app is using the camera, it can prevent your web app from accessing it.
A factory reset should be a last resort if all other troubleshooting steps fail to resolve the issue.
Dealing with a web app that can’t access your Android phone camera can be annoying, but most of the time, the issue can be fixed with simple steps. By checking permissions, updating your software, and adjusting browser settings, you can usually resolve the problem quickly. If these basic solutions don’t work, more advanced troubleshooting like resetting app preferences or testing in Safe Mode might be necessary.